Monday, June 28, 2010

Feathered Diamonds


The "Too Good To Cut" Radiant Star quilt is now quilted.  I'm very pleased with the large feathers in each of the eight diamond shapes.  The background and border and just small stipple quilted as it was VERY difficult to see the quilting as I was working on it!  In the end it just adds an all over texture and lets the feathers take the attention.

Baby's Stars

Another new baby quilt!  Mommy to be requested 5 pointed stars that weren't all lined up.  I hope she likes it!  Here's a closer look at the border fabric and the free form quilting.

Thursday, June 24, 2010

One Hundred!

This is quilt one hundred for me to quilt on my HQ 16!  We bought the machine in August so it is 10 months old...averaging ten quilts per month.  It is quilted with all over feathers in the center, tiny all over feathers in each of the four outer border corners, and long feathers in the 2" green border.  I love it! 

Now on to binding!

Sunday, June 20, 2010

Uncovering the Past

We have been taking down the paneling at the flower shop and uncovering the past.  On the south wall you can now see where the steps used to lead up to the doctor's office.  Long ago the building housed Walker Drug Store.  Elevated in the back was Dr Webster's office.  You can see in this picture the level of the raised floor (about 4 1/2 feet) on the left and where the stairs were at the right of the photo.  Wouldn't it be wonderful to have an old photo of how the building looked then?  Now all I have is a photo of the pharmacist, Tandy Walker!

The building is looking really LONG now that there are fewer obstacles in the way!  We have two more walls to take the paneling off then we can paint and expose some of the brick.

Friday, June 18, 2010

Finishing Babies!

Funny thing how inspirations go... you make something that inspires someone else, then in turn you are inspired by THEIR quilt and have to make another... and so it goes!  So here's my bright thimbles quilt!  The incredibly bright pink was a bit much around the border but somehow the lime green binding makes it all right.  Quilt magic I guess.

Here's another example of quilt envy... only it was a the baby thimble quilt I made for Presleigh.  After it was delivered to baby I missed it and certainly had enough fabric to make another.  So, combined with the doll fabric from another baby quilt, I made my very own!
In order to have the dolls all standing upright and not have to piece the border I decided to include some flying geese blocks, they give a little "direction" to the quilt as well!

The last baby quilt finished this week is for baby Cade.  We enjoy many laughing hours together when Mom is working.  He and Eli surely know how to appreciate a new quilt... when I lay it out and say "what do you think boys?"  they both immediately crawl over and hug the quilt and Cade says "Ohhh!" 
Don't forget me, baby Cade!


Monday, June 14, 2010

Too Good to Cut Part 2


I created this sweet star quilt using the Debbie Maddy pattern Radiant Stars and the same box of fabrics I used for the Too Good to Cut challenge.  As with all the Debbie Maddy patterns the star is a no "Y" seam construction. I did alter the pattern to use 9 1/2" triangles instead of piecing all the little squares which used much less fabric and looks tidier to me.

My original Sweet Thimbles quilt (for the challenge) focused more on the pinks while this quilt uses the pink as an accent color with green as the major color.  
Of course, as always there were smaller scraps of fabrics that needed sewing into a pineapple quilt.  This is very pastel for me and difficult to even fathom that I would sew it but it is very sweet and dainty!  I probably would not have chosen the border fabric for this particular quilt except that #1 I already had it and #2 I used it in the middle of the quilt but it does seem to liven up the pastels a bit!


Step by Step

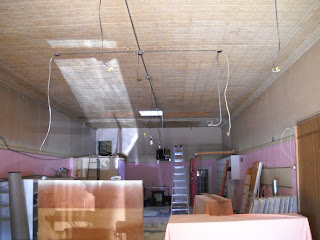
Finally all the suspended ceiling tiles are down along with the framework and support wires!  Then we took down the old AC duct work.  That make the biggest difference as they were right down the center of the building and wrapped in white insulation!  You could see from one end to the other except for all the shelves which are just too big to move around much!
The next step is exposing all the plaster by removing the 70's paneling.  We will chip away some of this plaster to show some of the brick.  In the process of removing the first 1/4 of the paneling we discovered that there was originally a display window at the front of the store which you can see below at the right of the photo.
There are several large and wonderful white shelves and a great counter that will go against the two walls on the left and right where we won't need to remove any plaster.
Coming soon... the new AC/heater!